My kitchen has been as busy as ever but with that and the many other activities going on... posting my recipes has become almost non-existent. Can you tell?!
:)
Anyway, there are easier and easier ways of posting things on these blogs so maybe I'll get it going and keep it flowing at some point. I have four notebooks full of recipes (culinary scrapbooks ... all unfinished!) and I really need to gather all of them, the reviews, pictures, and more and organize them so I can keep a running file of what we make and eat around here!
Just a note to share one of the bits I'm working on right now.
We are making a lot of salads, sandwiches, and quickly prepared stove top dishes to keep the kitchen from getting unbearably hot. No central heat or air so we have to be creative with fans, a couple of air units and baking/cooking schedules.
Until the next recipe or food share . . .
Tuesday, August 23, 2011

Spinach Lasagna... on our menu!

LASAGNA
serves 8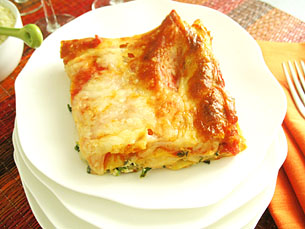
- 2 extra-large eggs (lightly beaten)
- 15 ounces of ricotta cheese
- 10 ounces of frozen spinach - defrost and squeeze dry
- 3/4 cup of grated parmesan cheese - divided
- 1 teaspoon of salt
- 1/3 teaspoon of ground pepper
- 1 teaspoon of oregano
- 26 ounces of spaghetti sauce
- 10 sheets of no-boil lasagna noodles
- 1 pound of shredded mozzarella cheese - divided
Ricotta Mixture:
In a medium bowl combine eggs, ricotta cheese, spinach, 1/2 cup of the parmesan cheese, oregano, salt and pepper.
Layer the ingredients in a 9 x 13 x 1 inch pan, in the following order:
Layer one
3/4 cup of the Sauce
3 Sheets of pasta
3/4 cup of the Sauce
1/2 of Ricotta Mixture
1 and 1/3 cups of the Mozzarella
Layer two
3 sheets of Pasta
3/4 cup of the Sauce
1/2 of Ricotta Mixture
1 and 1/3 cups of the Mozzarella
Layer three
4 Sheets of pasta
3/4 cup of the Sauce
1 and 1/3 cups of the Mozzarella
1/4 cup Parmesan Cheese
Bake for 30 minutes, until the sauce is bubbling.
Let sit for 10-15 minutes before cutting.
Sunday, July 31, 2011
Recipe using yellow squash & zucchini
I am sharing this just as I got it from a blog I subscribe to (links to it are "recipe" and Kayln) and it was such a hit that I have made four dishes of it so far! My husband and teenage daughter loved it and so did my D-I-Love. WONDERFUL recipe.
Easy Cheesy Zucchini Bake
(Makes 4-6 servings; recipe adapted from a recipe by Karen
Niessing in Penzeys Back to School 2011 Catalog, with suggestions from my
sister Pam.)
Ingredients:
2 medium-sized zucchin, cut in slices or half-moon slices
2 medium-sized yellow squash, cut in slices or half-moon slices
2-4 T chopped fresh basil (or even less, depending on how much you like the flavor of basil)
2 T thinly sliced green onion
1/2 tsp. dried thyme
3/4 tsp. garlic powder
1/2 cup + 1/2 cup low-fat white cheese (I used Pizza Cheese, which is a low-fat blend of Mozzarella, Provolone, Romano, and Parmesan)
1/2 cup coarsely grated Parmesan (I would use a little less if you only have the very finely grated Parmesan from a can)
salt and fresh ground black pepper to taste
Instructions:
Preheat oven to 350F/180C. Spray an 8" x 8" baking dish with olive oil or non-stick spray. Wash the squash and cut in slices or half-moon slices. Wash basil, spin dry or dry with paper towels and finely chop. Slice green onions.
Combine the sliced squash, chopped basil, sliced green onions, dried thyme, garlic powder, and both kinds of cheese and stir together until the veggies are coated with cheese and the herbs are well-distributed. Season with salt and fresh ground black pepper. Put the mixture in the baking dish and bake uncovered for about 25-30 minutes.
When the zucchini is nearly cooked through, take the casserole dish out of the oven and sprinkle over the remaining 1/2 cup of grated cheese. Put the dish back in the oven and bake 10-15 minutes longer, or until the cheese is melted and nicely browned and zucchini is fully cooked. Serve hot.
This kept well in the fridge overnight, but mine was gone the next day so I don't know if it would last longer than that!
This printable recipe from KalynsKitchen.com.
Ingredients:
2 medium-sized zucchin, cut in slices or half-moon slices
2 medium-sized yellow squash, cut in slices or half-moon slices
2-4 T chopped fresh basil (or even less, depending on how much you like the flavor of basil)
2 T thinly sliced green onion
1/2 tsp. dried thyme
3/4 tsp. garlic powder
1/2 cup + 1/2 cup low-fat white cheese (I used Pizza Cheese, which is a low-fat blend of Mozzarella, Provolone, Romano, and Parmesan)
1/2 cup coarsely grated Parmesan (I would use a little less if you only have the very finely grated Parmesan from a can)
salt and fresh ground black pepper to taste
Instructions:
Preheat oven to 350F/180C. Spray an 8" x 8" baking dish with olive oil or non-stick spray. Wash the squash and cut in slices or half-moon slices. Wash basil, spin dry or dry with paper towels and finely chop. Slice green onions.
Combine the sliced squash, chopped basil, sliced green onions, dried thyme, garlic powder, and both kinds of cheese and stir together until the veggies are coated with cheese and the herbs are well-distributed. Season with salt and fresh ground black pepper. Put the mixture in the baking dish and bake uncovered for about 25-30 minutes.
When the zucchini is nearly cooked through, take the casserole dish out of the oven and sprinkle over the remaining 1/2 cup of grated cheese. Put the dish back in the oven and bake 10-15 minutes longer, or until the cheese is melted and nicely browned and zucchini is fully cooked. Serve hot.
This kept well in the fridge overnight, but mine was gone the next day so I don't know if it would last longer than that!
This printable recipe from KalynsKitchen.com.
Sunday, July 24, 2011
My favorite, new, THIN pizza crust
I have honestly made this so many times now that I cannot
begin to guess a number. I will tell you this: when I am baking ANYthing now
that resembles dough ... my kids will say: "You aren't making pizza AGAIN,
are you?!"
They loved it but after a few weeks... they started tiring.
I did not. I have made these with thinly sliced yellow squash and zucchini
straight from the garden, with portabello mushrooms, with sun dried tomatoes, broccoli,
chicken, baby spinach leaves, red onion, Vidalia onion, and the list keeps
going on and on and on and on.
Amazing!
I shared the link at the bottom of the site I got it
from. No surprise ... another one from The Kitchn!
1-Ingredient Ice Cream ... Made it!
I tried this one ingredient ice cream recipe and wowed everyone in the room! At first, the kids, teens and adults looking on had skeptical glances at the food processer and joked about it possibly not working so well. Within minutes... it all changed to incredulous stares and the tapping of metal spoons flying out of the drawer and into the bowls. This cold treat has a beautiful texture and I drizzled a tiny bit of honey on mine and made a second batch with peanut butter. Very good!
Classic Southern Pralines
One of my FAVORITE blogs is:
http://www.thekitchn.com/
... and I've developed quite an addiction to it. When the following recipe was shared there for praline pecans posted... I couldn't wait to try these. I've made them two times and they were devoured all too quickly. A lady at church tried some and asked to buy some from me! I followed the directions to the letter.
Sweet No-Bake Recipe: Classic Southern Pralines
 It
was 95° in my apartment and not a day to be anywhere near the kitchen.
But my sweet tooth, well, it had other plans. Luckily, our Southern
neighbors are used to facing such demands in the hottest and stickiest
of weathers, which is why they had the good sense to invent the praline.
It
was 95° in my apartment and not a day to be anywhere near the kitchen.
But my sweet tooth, well, it had other plans. Luckily, our Southern
neighbors are used to facing such demands in the hottest and stickiest
of weathers, which is why they had the good sense to invent the praline. You
can call the praline a cookie, because it's shaped like one, but it's
rightfully a type of candy. You make them entirely on the stove top by
boiling a mixture of chopped pecans, sugars (two kinds!), butter, milk,
and vanilla until it becomes creamy and caramelized. But if the sight of
a candy thermometer makes your head hurt, don't worry. These cookies
(er...candies) are different.
You
can call the praline a cookie, because it's shaped like one, but it's
rightfully a type of candy. You make them entirely on the stove top by
boiling a mixture of chopped pecans, sugars (two kinds!), butter, milk,
and vanilla until it becomes creamy and caramelized. But if the sight of
a candy thermometer makes your head hurt, don't worry. These cookies
(er...candies) are different.Counter-intuitively for those of us who do much candy-making, the key to a good batch of pralines is stirring the pot constantly. This is the one time when that annoying habit sugar has of crystallizing at the least provocation is actually something that you want. You stir as the sugar syrup comes up to a boil, stir while it's boiling, and keep stirring as it cools down into something manageable.
The moment when you feel the syrup turn grainy with sugar crystals, that's when you start dropping them onto your parchment paper like it's going out of style. Don't worry about being neat or forming perfectly uniform candies; just scoop, drop, and let them form whatever shape they may. (Incidentally the praline pros down in Louisiana call the accidental drippings between scoops "praline turds." Poetic, right?!)
I took a class in making pralines at The New Orleans School of Cooking during my trip to New Orleans. They're the perfect warm-weather treat because they require minimal effort, minimal time in front of a hot stove, and no baking. Plus they're ready in about fifteen minutes. And trust me, you want to try them while they're still warm. They practically dissolve on your tongue and that, right there, is heaven.
 Classic Southern Pralines
Adapted from The New Orleans School of Cooking
Makes 20-50 pralines, depending on how large or small you drop them
1 1/2 cups (12 oz) granulated white sugar
3/4 cup (6 oz) light brown sugar, packed
1/2 cup (4 oz) milk - whole is preferred but 2% is fine
6 tablespoons (3 oz) salted butter
1 teaspoon vanilla extract
1 1/2 cup (12 oz) pecans - I like them roughly chopped, but you can leave them whole or chop them more finely. You can also toast the pecans, if desired.
Before starting to cook, lay out a piece of parchment, aluminum foil, or a silpat for the pralines. Set a second spoon nearby in case you need to scrape the candy off the first spoon.
Combine all the ingredients in a medium sauce pan, at least 4 quarts. Do not use a smaller pan as the syrup will bubble up during cooking. It's also harder to stir in a smaller pan.
Cook the syrup over medium-high heat, stirring occasionally. When it comes to a boil, start stirring constantly. Let it boil for about 3 minutes, until the syrup registers 238°f - 240°F on a candy thermometer.
Remove the pan from heat immediately and keep stirring. Stir, stir, stir! It will become creamy, cloudy, and start to thicken. When you feel it starting to get grainy, the pralines are ready. You can also hear it if you listen closely; the crystals will make a scraping noise against the side of the pan.
Drop spoonfuls of the praline syrup onto your waiting parchment. Work quickly, as the syrup starts to set as it gets cool. Let the pralines cool and harden for at least ten minutes before eating. They will keep in an airtight container for several days, but they're at their very best within the first 24 hours of making them!
One last thing: don't forget the pan scrapings! Whatever is left in the pan is the cook's treat. Scrape those up and eat them with a spoon.
Praline Variations:
• Chocolate Pralines - Add 1/2 cup of chocolate with all the ingredients
• Peanut Butter Pralines - Add 1/3 cup of peanut butter in the last 30 seconds of boiling the syrup
• Nut-Free Pralines - Add 1 1/2 cups puffed rice cereal right before you start dropping the candies
 Related: Sweet Desserts Without Heat: 25 No-Bake Summer Desserts
(Information for this post was gathered during a press trip to New Orleans sponsored by the Louisiana Seafood Board. All views and opinions expressed in this post are the personal views of the author.)
(Images: Emma Christensen)
Honey Baked Chicken
Honey Baked Chicken II



What to Drink? |
|

|
Chardonnay |
Prep Time:
15 Min
Cook Time:
1 Hr 15 Min
Ready In:
1 Hr 30 Min
Ingredients
- 1 (3 pound) whole chicken, cut into pieces
- 1/2 cup butter, melted
- 1/2 cup honey
- 1/4 cup prepared mustard
- 1 teaspoon salt
- 1 teaspoon curry powder
Directions
- Preheat oven to 350 degrees F (175 degrees C).
- Place chicken pieces in a shallow baking pan, skin side up. Combine the melted butter or margarine, honey, mustard, salt and curry powder and pour the mixture over the chicken. Bake in the preheated oven for 1 1/4 hours (75 minutes), basting every 15 minutes with pan drippings, until the chicken is nicely browned and tender and the juices run clear.
Subscribe to:
Posts (Atom)